Table of Contents
- Introduction
- How to communicate with Bluehost tech support
- How to view and backup .htaccess files (and other hidden files)
- How to change the PHP version on all your websites using PHP Config from the cPanel
- How to check your PHP version and configuration with phpinfo
- How to identify and edit the applicable php.ini file
- Check the file paths for your “include” commands
- Delete or hide your phpinfo.php file once you’re done with it
- Conclusion
Introduction
On May 1, 2019, Bluehost sent me (and I assume their other customers) a form email that said “we’re excited to announce that we will be upgrading all of our servers to newer versions of Apache and providing newer versions [of] PHP (including PHP 7.1 & 7.2).” At the time, I was using Bluehost to host several websites which I had hand-coded. My sites were very basic and used little to no PHP, so I didn’t expect that the upgrade would cause a problem.
On those websites where I used PHP, I used it mostly for the “include” command. I had one file for each component that’s the same on every page — such as the header, footer, and menu — and used “include” to include it on each page. For a slightly fuller explanation of this type of use, see W3Schools’ description here. The official documentation for “include” is here.
Unfortunately, after Bluehost’s PHP upgrade, I noticed that the menus and other static content were missing from my websites, which I concluded must be because my “include” commands weren’t working. Bluehost does warn that this might happen, here.
After quite a bit of back-and-forth with Bluehost, and troubleshooting on my own, I got everything working and upgraded to PHP version 7.3. It turns out that on some lines of code, the missing content was my mistake because I misunderstood how PHP interprets file paths. But it also took longer than it should have to resolve the issue because Bluehost gave me incorrect information multiple times. I started writing an email to them listing my complaints, but decided to turn it into this article instead, in the hopes that it will save time for anyone else encountering similar issues. (It’s likely that these steps would work exactly the same at other hosting providers, but I can’t vouch for it.)
Below, I’ll list each problem I encountered and how I fixed it.
For this article, I’m assuming you know how to access and use the cPanel and file manager; create, edit and delete files; check that your websites are working (which may require clearing browser data), and that you have a general familiarity with the PHP “include” command.
How to communicate with Bluehost tech support
Bluehost provides tech support by phone or online chat. If they can’t resolve your issue during the call/chat, they’ll email you after they’ve done more research on their end, and later correspondence can be by email.
If Bluehost sends you an email but you don’t reply in a timely fashion (I’m not sure of exact time limit), they’ll close the case (without notice to you). If you want to follow up by email after that, you need to call or do an online chat with them first and have them reopen the case, otherwise your email will bounce back.
Bluehost’s tech support has been hit-or-miss for me, although I’m leaving out the details for brevity. Hopefully by providing this article, I’m sparing someone else the inconvenience of dealing with them.
How to view and backup .htaccess files (and other hidden files)
Later, I’ll discuss how to change your PHP version using PHP Config. But Bluehost warns that you should backup your .htaccess files first, so I’m discussing that first.
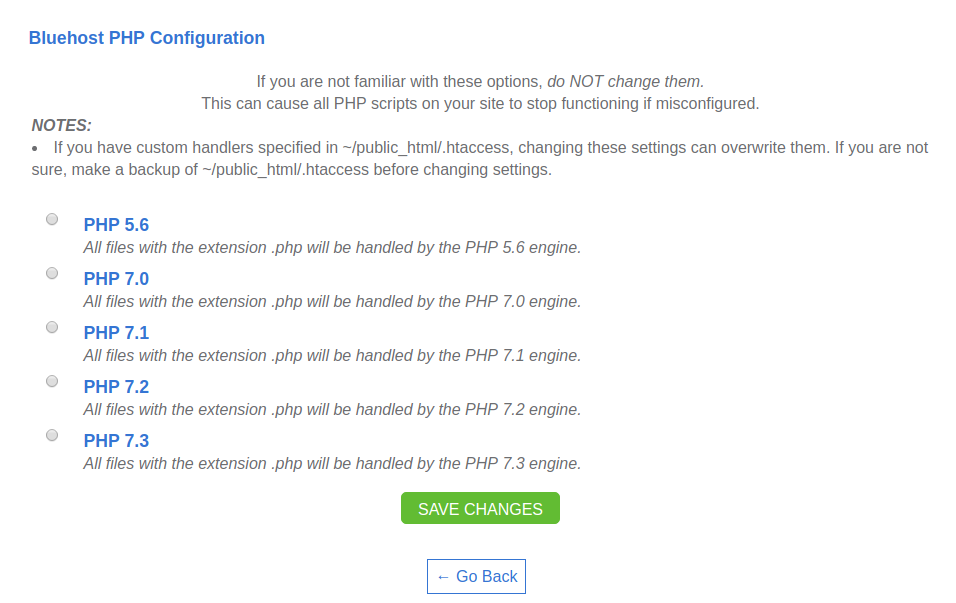
When you go into PHP Config (discussed below), you’ll see a screen that looks like the image below. It warns, “If you have custom handlers specified in ~/public_html/.htaccess, changing these settings can overwrite them. If you are not sure, make a backup of ~/public_html/.htaccess before changing settings.”

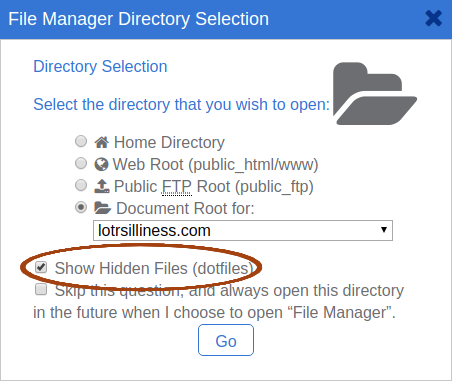
The problem is that Bluehost makes it very difficult to access your .htaccess files. When you go into your file manager (whether current or “legacy” version), Bluehost hides hidden files, even if you check the box for “show hidden files.” Yes, they warn you to backup .htaccess files while hiding those files.

Luckily, I remembered this from a prior issue, and knew how to access them: while in the file manager, you need to append “&showhidden=1&saveoption=1” to the url. Use the current file manager, not the “legacy” one, which tends to jump up to higher-level folders unexpectedly. Using this method, you can check each of your sites and make a backup of any .htaccess files before changing your PHP version.
How to change the PHP version on all your websites using PHP Config from the cPanel
When I noticed that my “include” commands had stopped working, I started an online chat with Bluehost. After I described the issue, the CSR wrote “I have updated PHP version back to 5.6” (an earlier version). But that’s not what I wanted — I wanted to get my sites upgraded to a newer version, but also working.
Rather than have Bluehost make more unwanted changes, I took matters into my own hands and upgraded my PHP version from the cPanel. You can do this by choosing “PHP Config” under “programming”:

Note that this will change the PHP version on all your sites (if you have multiple sites). Apparently it’s possible to have different sites use different PHP versions, but I didn’t attempt that, so I’m not discussing it here.
How to check your PHP version and configuration with phpinfo
Before troubleshooting your PHP configurations or code, you should verify which PHP version you have installed.

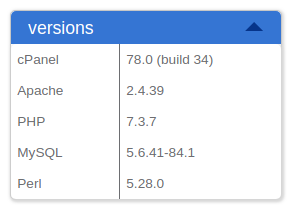
Looking at the bottom left column of your cPanel (which will look like the image at left), it purports to show you your PHP version, but don’t rely on this.
At one point my account was set to PHP version 5.2.17 but cPanel was showing it as 5.4.45. I asked about this, and Bluehost replied, “Due to [a] technical glitch PHP version is not properly updating in under [sic] the Versions section of cPanel.”
A better way to check your PHP version is by creating a phpinfo.php file. These are very simple to create and show all the details of your PHP configuration.
Just create a new file — you can call it anything you want, but it’s usually called phpinfo.php — and put this code in it:
<?php phpinfo(); ?>
Then open the file in your browser and it will show your php version at the top, and other useful information in a table (discussed below).
Identify and edit the applicable php.ini file
When PHP starts up, it checks the configuration file, php.ini. You can change how PHP functions by changing this file.
Your server may contain multiple php.ini files, so you need to make sure you’re looking at and editing the one that applies to the website you’re troubleshooting, or you’ll make changes and wonder why they have no effect.
Bluehost kept incorrectly telling me to look at the php.ini file in public_html. But I had problems on multiple sites, so what they should have said is to check which php.ini applies to each site, and then edit any that are misconfigured. It doesn’t matter what the settings are on public_html/php.ini if my site is using (for example) public_html/lotrsilliness.com/php.ini.
You can check which php.ini file your site is using by looking at your phpinfo.php file (discussed above). Look for the line that provides “Loaded Configuration File” which will look something like this:
| Loaded Configuration File | /home1/example/public_html/lotrsilliness/php.ini |
That’s the php.ini file you’ll need to edit to change your php configuration.
Still looking at your phpinfo.php file, now look for these two lines:
| allow_url_fopen | On | On |
| allow_url_include | On | On |
If allow_url_fopen and/or allow_url_include are set to “0,” “Off,” “False” or “No,” that might be what’s keeping your include commands from working. If that’s the case, go into the applicable php.ini file (the one named as the “loaded configuration file”) and change “allow_url_fopen” and “allow_url_include” to On. (You can also use 1, True or Yes.) Save the file. Now refresh your phpinfo.php file, and it should show these two lines as “On.”
Now check your websites(s) (remembering that you may need to clear browser data before refreshing) and see if the “include” commands are working.
Check the file paths for your “include” commands
If your “include” commands still aren’t working, it might be your code. File paths are interpreted differently in HTML than in PHP, and apparently this is a common point of confusion. As described in the last comment on this page:
when Apache gets a request for http://example.com/path/to/file.php, it looks in its Document Root directory for a file at “path/to/file.php”. However, the actual file path is something like /users/youre-name/example.com/public-html/path/to/file.php.
And there’s a long article about it here — Relative and absolute paths, in the file system and on the web server.
Check your code that “include” commands are referring to files using the correct paths, whether relative or absolute. Update your code if necessary, and check your site again. (Remember that you may need to clear browser data before refreshing.) If your site has folders and subfolders, check pages at different file levels, to make sure the “include” commands are working at every level.
Delete or hide your phpinfo.php file once you’re done with it
As useful as this file is to you, it’s at least equally useful to a hacker, who can conveniently see all your configurations and look for vulnerabilities you may not be aware of. You can always re-create the file if you need it again.
Conclusion
I hope this was helpful!
Please note that I can’t provide tech support, but if you encountered and solved a related problem, feel free to describe it in the comments. Thanks for reading.
Donations are greatly appreciated!
If this post saved you time or money, or you just enjoyed reading it, donations are very much appreciated. Your donation will enable me to spend more time writing helpful posts like this one.
Donations made via the form below are processed securely through PayPal. Amounts shown are in US dollars.
